How to Use a Glucometer: A Step-by-Step Guide for Diabetes Management

Each article on the fitterfly website is a labor of love, reviewed by a team of certified medical experts specializing in various fields like Diabetology, Nutrition, Physiotherapy, Psychology.
They carefully examine all references and facts to provide up-to-date and reliable information, aiming to break myths and empower you in your health journey.
Meet Our Reviewing Team


Dr. Vidya Jaydeep Walinjkar
Dr. Vidya Walinjkar has 14 yrs of experience as a diabetologist and physician. She currently works as a Consulting Diabetologist and Program Consultant for Type 2 diabetes members at Fitterfly.
Read more
What is a Glucometer?
Self-monitoring blood sugar levels is an important part of diabetes management. Glucometers are the most widely used devices for home monitoring of blood sugar levels.
This self-monitoring device requires a small blood sample (from a pin prick), unlike laboratory tests in which a larger blood sample.
There will always be some difference between a laboratory test result and a glucometer reading due to the difference in the blood sample collected and laboratory tests being performed in more controlled conditions.
Capillary blood glucose level (collected in a glucometer reading) is often higher than a venous blood glucose level (measured in a lab test).
Glucometers are available at a wide range of prices, ease of use, compact nature and length of testing time. Some glucometers have additional features for people who have vision problems.
Diabetes Reversal
Calculator
To know your chances of Diabetes reversal, take the Diabetes Reversal Test
How Does a Glucometer Work?
Today’s most widely used glucometers use test strips containing an enzyme called glucose oxidase. This enzyme reacts with glucose in the blood drop and the electrode interface inside the glucometer.
When the strip with the blood drop is inserted into the glucometer, a chemical reaction with glucose generates an electrical signal, which gives you a blood sugar reading on the glucometer. Based on the strength of the electrical signal, glucose levels appear digitally.
Why Should One Use a Glucometer?
Glucometers are helpful for blood sugar monitoring in the following scenarios:
- To check if blood sugar levels are under control
- To assess the pattern of rise or fall in blood glucose levels
- Understand how certain foods and exercising affect blood glucose levels
- Monitor the effect of diabetic medications
- Evaluate and assess your diabetes treatment goals
- Enable dose adjustment of insulin and diabetic medication
Glucometers are preferred for the following features:
- They are convenient
- Cost-effective
- Easy-to-use
It is important to remember that glucometer readings should not be used to diagnose diabetes. When in doubt, the glucometer readings must always be cross-checked with laboratory blood sugar and HbA1c tests.

Things to Consider While Buying a Glucometer
When looking for a glucometer, it’s like picking a helpful buddy for managing your diabetes. You want one that’s easy to use, fits your budget, and remembers your blood sugar readings. Here’s a simple breakdown:
-
Accuracy
Look for clinically validated devices.
-
Ease of Use
Simple interfaces, easy-to-handle strips, and clear displays.
-
Cost
Consider the price of the device and ongoing costs of strips and lancets.
-
Features
Data storage, connectivity with apps, or alert systems.
-
Insurance and Warranty
Check coverage and warranty for the device.
Remember, while glucometers are super helpful, to self monitor your blood sugar level. Talk to your doctor to find the best one for you and understand its limits.
Best Available Glucometer Brands in India
Every glucometer has its own set of features and benefits, so it’s important to choose one that fits your lifestyle, budget, and specific health needs. Here are a few best available glucometers in India:
-
Accu-Chek Instant Glucometer
This is widely used due to its quick results, Bluetooth connectivity, and ease of use. It’s priced reasonably and can store many readings.
-
Accu-Chek Guide
Known for its spill-resistant vial and Bluetooth connection that logs readings directly into an app. It’s praised for its accuracy and convenience.
-
OneTouch Verio Flex
This compact glucometer uses ColorSure technology to indicate when readings are out of range and syncs with a mobile app via Bluetooth. It’s known for its portability and accuracy.
-
One Touch Select Plus
Meeting international accuracy standards, this device offers quick results, a simple interface, and high accuracy.
-
Dr Morepen GlucoOne
This is a travel-friendly option known for its affordability and accuracy. It comes with a generous number of test strips.
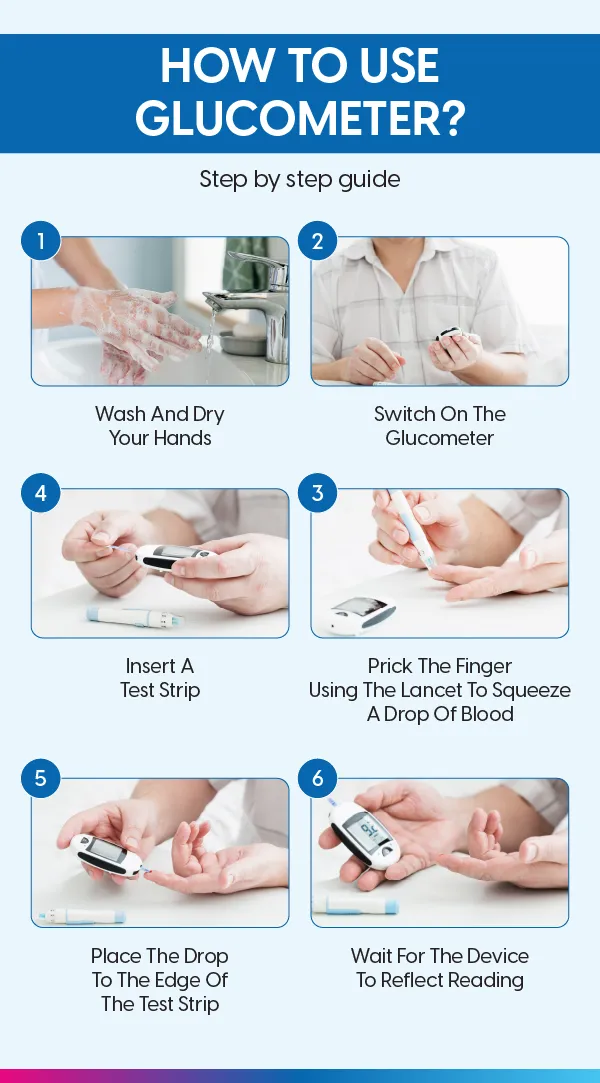
How to Use a Glucometer? A Step-by-Step Guide
Using the glucometer is simple, and following the instructions can help in the accurate measurement of blood glucose levels in an individual.
1. Gather Your Supplies
Before you start, ensure you have all the necessary supplies: the glucometer, test strips, lancet device, lancets, alcohol wipes, and a logbook or digital tracking tool.
2. Wash Your Hands
Begin with clean, dry hands. Proper hand hygiene is essential to ensure accurate results.
3. Powering On the Glucometer
Turn on the glucometer following the manufacturer’s instructions. Most devices have a simple on/off button.
4. Inserting a Test Strip
Insert the glucometer strip with the contact bar facing upwards into the device’s strip port. Hold the strip-till the meter detects it.
When the glucometer indicates it is ready for use, follow the steps to collect the blood sample.
5. Preparing the Lancet Device
- Twist and remove the internal cap of the lancet.
- Hold the lancet at its circulate tip and insert it into the mounting tool.
- Rotate the protective cover of the lancet slowly and keep it ready for use.
- Re-attach the internal cap over the mounting tool.
- Select the penetration depth based on skin thickness (1 being the least and 5 being the deepest penetration level).
- Hold the lancet by clasping the adjustable tip in one hand and pulling the sliding barrel till you feel a prick.
- This causes the lancet to prick the test site to enable blood sample collection.
6. Pricking Your Finger
Place the lancet against the finger pad of your ring finger (the prick is usually given on the side of the finger pad).
When you are ready, hit the trigger.
7. Collecting a Blood Sample
Remove the lancing device from the finger and allow a drop of blood to form.
Apply this blood drop on the narrow end of the test strip placed inside the glucometer. Till the confirmation window is filled, you must continue to apply the blood sample.
8. Waiting for Results
Within a few seconds, the glucometer will display your blood sugar level. Depending on your device’s type, it will store the same in a mobile app, or you may have to note the reading down manually.
Post-Testing Steps
Once the test is done, clean the finger with clean cotton and remove the internal cap of the lancing device. Remove the lancet from the mounting device by pressing the release button. Dispose of the needle and the test strip safely.
If the glucometer shows an error in the reading, you must replace the strip and redo the test.
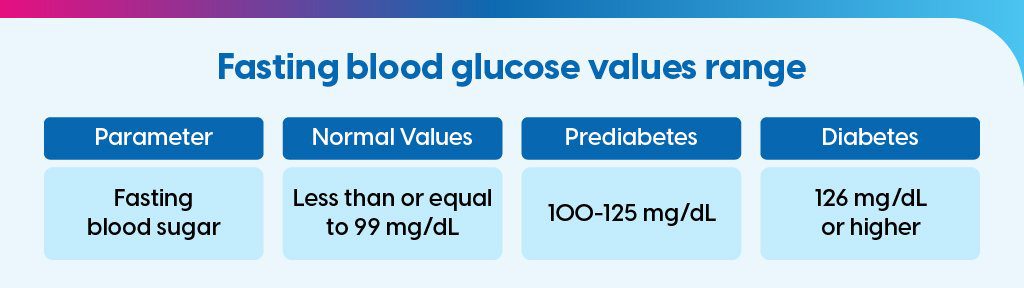
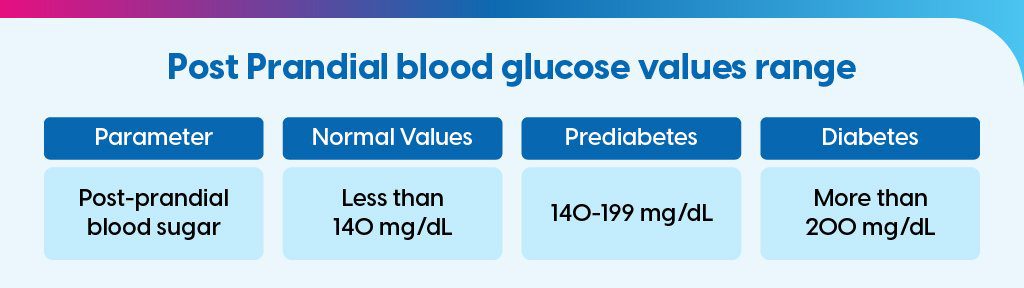
Blood Sugar Levels
When to Check Your Blood Sugar Level?
Checking your blood sugar levels at the right times is key to managing your health effectively. Here are the best times to check:
-
Fasting Blood Sugar:
In the morning before breakfast.
-
Postprandial Blood Sugar:
1 to 2 hours after meals.
-
Before Meals:
To make informed dietary choices.
-
Before Bedtime:
To ensure levels are stable through the night.
-
Before and After Exercise:
To understand how physical activity affects glucose levels.
-
Randomised test:
If you have any symptoms you should check your blood sugar levels.
How to Avoid Incorrect Readings?
To avoid incorrect blood sugar readings from your glucometer, it’s important to follow these steps:
-
Clean and Prepare Properly:
Wash hands with soap and water to remove any contaminants that might affect the reading.
-
Check Expiration Dates:
Ensure test strips and lancets are not expired.
-
Proper Storage:
To maintain accuracy, store test strips and equipment according to manufacturer guidelines.
-
Calibration:
Regularly calibrate your glucometer if required.
-
Use Fresh Blood Samples:
Apply a fresh blood sample and avoid smearing or excessive application.
-
Avoid Damaged Strips:
Never use damaged or bent test strips.
-
Follow Instructions:
Use the glucometer and strips as directed in the user manual.
Tips to monitor blood sugar levels for Kids
Monitoring blood sugar levels for kids involves a bit more care and attention. Here’s a tip to help parents manage this task:
-
Parental Education & Teaching:
Teach your child with step-by-step guidance and make them learn how to use a glucometer. As they mature, encourage referring to the instruction manual for independence.
-
Emotional Support:
Provide reassurance and comfort during tests and encourage them as they progress.
-
Incorporate into Routine:
Make blood sugar testing a regular part of the child’s routine.
-
Educate:
parental education Teach children about the importance of monitoring and how to read results.
-
Be Supportive:
Provide emotional support, especially if they are fearful or anxious about testing.
-
Check Frequently:
Children’s blood sugar can be unpredictable; check frequently and adjust as needed.
-
Involve Healthcare Providers:
Regularly consult diabetes healthcare professionals for personalized advice and adjustments.
-
Gradual Independence:
As they learn, encourage them to take on more responsibility for their diabetes management, supervising their technique and understanding.
By incorporating these strategies and tools, you can enhance the accuracy of blood sugar readings and manage diabetes more effectively, especially in children who require special consideration for their developmental stage and lifestyle.
Continuous Glucose Monitors (CGM): An Alternative of Glucometer and its Benefits
CGMs provide real-time, dynamic glucose information by measuring glucose in interstitial fluid. Key benefits include:
-
Real-Time Feedback:
CGMs provide continuous readings, revealing trends and patterns in glucose levels.
-
Alerts:
Many CGMs alert users when glucose levels are too high or low.
-
Reduced Fingersticks:
CGMs can reduce or eliminate the need for regular fingersticks.
-
Data Sharing:
Some CGMs allow data sharing with healthcare providers for better management.
-
Improved Glycemic Control:
By understanding fluctuations, users can adjust food intake, physical activity, and medication.
FitterTake
Glucometers are essential for self-monitoring of blood glucose in people living with diabetes or other conditions that require them to monitor their blood sugar levels regularly. Besides enabling better management of diabetes, glucometers also help prevent complications of diabetes.
They are a portable and handy way to check blood glucose levels at any time or any place, allowing individuals to manage their blood sugar levels effectively.
If you have diabetes and are looking for guidance to manage the condition better, learn more about our Diabetes Management Program, which has helped hundreds of others. We understand diabetes and also your pain. We are here to help you 😇
Speak to us today! Just give us a missed call at 08068507599, and we will get back to you.
This blog provides general information for educational and informational purposes only and shouldn't be seen as professional advice.
Frequently Asked Questions
Why is it important to monitor blood sugar levels at home?
Monitoring blood sugar at home is crucial for managing diabetes effectively. It helps you and your healthcare provider to decide about your diet, exercise, and medication, reducing the risk of complications.
How often should I check my blood sugar levels?
The frequency depends upon the type of diabetes, your blood sugar levels and the medications/insulin you take to control your blood sugar levels. Your healthcare provider will recommend a schedule based on your condition and treatment plan.
Can I use any glucometer, or do I need a specific type?
You should choose one that meets your specific needs in terms of features, cost, and insurance coverage. Consult with your healthcare provider for recommendations.
What are test strips, and why do I need them?
Test strips are used with a glucometer to measure blood sugar. Each strip contains chemicals that react with glucose in the blood. They're single-use and essential for accurate readings.
How do I know if my glucometer is accurate?
Regularly check it with control solution tests and compare results with lab tests. Ensure proper maintenance and follow the manufacturer's instructions for accuracy.
Are there alternative sites for blood sampling besides the fingertip?
Yes, you can alternate your hand fingers and take samples from alternate sites such as palm or forearm.
What is the target blood sugar range, and what do my results mean?
The target range varies individually depending upon your type of diabetes, age, and medication but is generally between 90 and 130 mg/dL before meals and less than 180 mg/dL after meals (as per ADA). Consult with your healthcare provider for guidance and interpretation.
Can I use the same lancet multiple times?
Ideally, they are meant to be single-use only but depending upon the sharpness and sterility you can use the same lancet again with proper precautions.
How should I dispose of used lancets and test strips?
Dispose of them in a hard plastic or metal container that's sealable and label it as biohazard or sharps. Follow local regulations for the disposal of such waste.
What if I have difficulty obtaining enough blood for the test?
Ensure hands are warm, clean, and dry. Dangle your hand down to increase blood flow. Press around the puncture site. If issues persist, consult with a healthcare professional.
Can I use the same test strip for more than one test?
No, test strips are designed for single use only to ensure accuracy and hygiene.
How do I troubleshoot if my glucometer is not working correctly?
Refer to the glucometer manual for specific error messages and troubleshooting tips. Check battery life, ensure strips are compatible and intact, and consider the device's cleanliness and maintenance. You can also speak to the manufacturer for more information.
 References